Leaderboard Ad


Thursday, June 13, 2013

How To Flip an Image Vertically or Horizontally in OpenOffice Draw


To Flip an Image Vertically, first select the Image and click on Modify > Flip > Vertically from the Menu Bar.

The Resulting Image will be Flipped Upside Down compared to the Original Image. 


To Flip the Image Horizontally, select Modify > Flip > Horizontally.


The Resulting Image will face the Opposite Direction compared to the Original Image. 

How To Rotate An Object in Inkscape - Free Rotate, Specific Degrees and 90 Degree Increments

Free Rotate An Object

Select the Object that you wish to Rotate. 

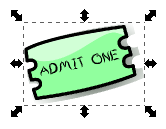
8 Black Arrows will appear around the Object when it is selected. These are Resizing Handles.

Clicking on the Object again will change the Resizing Handles to Rotation and Skew Arrows. 

The Rotation Arrows are at the 4 Corners of the Object. Move the cursor over any one of them, hold the mouse button down, and turn the mouse in a Clockwise or Counter-clockwise direction to Free Rotate.

Rotate Object To A Specified Degree


Go to the Menu Bar and select Object > Transform. 


This will open the Transform Window which has 5 Tabs, namely Move, Scale, Rotate, Skew, and Matrix.  


Select the Rotate Tab.

Where you see Angle, you will type in the Degrees you would like the Object to be Rotated.

Keep in mind that to Rotate the Object Clockwise, you will have to enter a Negative Number (e.g. -30). 

To Rotate the Object Counter-clockwise you will have to enter a Positive Number (e.g. 30). Click on the Apply Button when finished.

Rotate Object in 90 Degree Increments

Select the Object you wish to Rotate. 

Go to the Menu Bar and select Object > Rotate 90 Deg CW.


This will move your Object forward in a Clockwise Direction at 90 Degree Increments each time you use it.


To Rotate in a Counter-clockwise Direction go to Object > Rotate 90 Deg CCW. 


This will move your Object backward in a Counter-clockwise Direction at 90 Degree Increments each time you use it.


Wednesday, June 12, 2013

How To Insert an Image in Inkscape

To Insert an Image in Inkscape, go to the Menu Bar and select File > Import.


This will open up the Select File To Import Window. 


Select your image and click on the Open Button in the bottom right corner.

This will then open the Link or Embed Image Window. 

An Embedded Image stands alone, but results in a Larger SVG File. 

A Linked Image references a file outside the SVG document you are working on resulting in a Smaller SVG File.

Make your selection and click the OK Button in the bottom right. 


The Image will be surrounded by 8 Resizing Handles. They allow you to Resize your Image.


How To Free Rotate an Image in OpenOffice Draw


Assuming that you already have inserted an Image on your page in the OpenOffice Draw program, move your cursor over it. Select the Image. 

8 Green Square Handles will appear around the Image. These Handles are used for Resizing.

 
Go to the Drawing Toolbar that's located on the bottom of the page and select the down arrow to the right side of the Effects Icon. 

This action opens a popup menu. Select the first Icon for Rotation.


The 8 Green Squares Handles around the Image will change to 8 Red Circle Handles.


The 4 Circle Handles in each corner will be for Free Rotating the Image. The other 4 Handles will be for Skewing the Image. To Free Rotate the Image, move the cursor over 1 of the corner Circle Handles. 

Notice the cursor will change to a Rotation Handle. 


Hold down your mouse button and move in a Clockwise or Counter-Clockwise direction. 

Then you will have a rotated object or image as the case may be.

Sunday, June 2, 2013

Latest Additions to FlyerTutor.com

For in depth tutorials on Microsoft Word, check out the latest tutorials from FlyerTutor.

Each tutorial provides illustrated step by step instructions on recreating each flyer and using Microsoft Word's Interface. Check out the tutorials below:


Microsoft Word Tutorial - 4th of July Independence Day Flyer


This tutorial shows you how to recreate an Independence Day Flyer using the Business Application - Microsoft Word.


With it you will learn how to do Document Setup, Create Rectangles, Create Duplicates, Edit Points, Rotate Shape, Fill & Outline Color, Royalty Free Clip Art, Shape Effects - Glow, Insert Picture, Format Shape Outline, Edit Image, Free Fonts, Insert Text, Text Fill & Stroke, and Save a File.

View Tutorial


Microsoft Word Tutorial - Computer Classes Flyer Background Video

This tutorial shows you how to recreate the background for a Computer Classes Flyer using the Business Application - Microsoft Word.

With it you will learn how to do Document Setup, Create Rectangles, Create Duplicates, and set Fill & Outline Color.


Disqus