 |
| Blended Text |
The
Blend Tool is used to
Blend 2 Objects together.
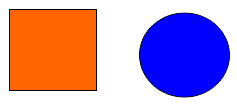
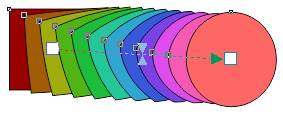
Start off by putting
2 Shapes on the page. Add a
Rectangle and a
Circle, using the
Rectangle Tool and
Ellipse Tool.
Add a different
Fill Color to each
Shape. First select the
Rectangle and click a
Color on the
Color Palette located on the
Left of the
Screen.
Repeat for the
Circle, choosing a different
Color.
Move your cursor over the
Drop Shadow Tool on the
Toolbox.
Click the
Black Arrow on the
Right of this
Icon to open a
Flyout Menu.
Select
Blend.
Move your cursor over any one of the
Shapes, hold down your mouse button and drag to the next
Shape.
You have a
Blended Shape.
If you want to create your own
Freehand Path for the
Blend, hold down your
Alt Key while making the
Blend.
The
Blend with follow the
Path that you've drawn.

This is the
Slider.
Move this
Slider to the
Left or
Right to adjust the
Color Progression from
Start to
End and also the
Distance between
Shapes in the
Blend.
See the
Progression of Color changes to be more
Blue if the
Slider is moved to the
Left.
Here more
Orange is seen as the
Slider is moved to the
Right.
If you want to change the
Start Color of the
Blend, select a
Color from the
Color Palette and drag to the
White Square Handle located in the
Middle of the
Circle.
If you want to adjust an individual piece of the
Blend, doulble click over that piece, and drag the
Slider that appears.
You can clearly see
2 Sliders now, one is
Green and the other is
Red. Drag the new one
Left or
Right to make the adjustment.
You can now adjust the location of all
3 Handles of the
Blend.
You can further manipulate the
Blend by using the
Blend Property Bar.
Check out the
Presets.
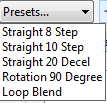 |
| Blend Presets |
Hit the
Drop Down Arrow and choose an
Option to see how it changes your
Blend.
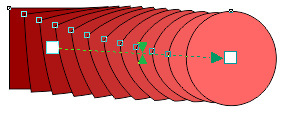 |
| Direct Blend |
All the
Blends done so far, have been
Direct Blends because there is a
Direct Color Progression.

This is the
Direct Blend Icon.

Selecting the
Clockwise Blend Icon will create a
Clockwise Progression through the
Color Spectrum.
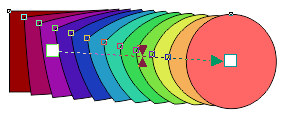 |
| Clockwise Blend |
Here's the effect on the
Blend.

Whereas, selecting the
Counterclockwise Blend Icon will create a
Counterclockwise Progression through the
Color Spectrum.
 |
| Counterclockwise Blend |
Here's the effect on the
Blend.
Play around with the
Property Bar and discover all you can do with
Blending.
Here are some practical examples of the
Blend Tool.
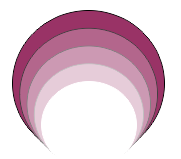 |
| Blended Circles |
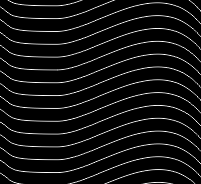 |
| Blended Lines |


 Move your cursor over the Drop Shadow Tool on the Toolbox.