Leaderboard Ad


Friday, August 8, 2014

Create Your Own Contours with Corel Draw

Contoured Text
Let's start by adding a Rectangle on the page. Select the Rectangle Tool from the Toolbox and draw.

Select any Color on the Color Palette to set the Fill of the Rectangle.

Move your cursor over the Drop Shadow Tool on the Toolbox.


 Click the Black Arrow on the Right of this Icon to open a Flyout Menu.

Select Contour.

Click on the Rectangle and Drag towards the Center, then release.

An Inside Contour with Linear Colors will be applied to the Shape.
The Reverse of this would be to Drag Outward in order to create an Outside Contour.
To change the Fill Color of the Contour, drag a Color of your choosing to the Square Handle and release.
  To change the Outline Color of the Contour, drag a Color of your choosing over the Diamond Handle and release.
Notice this Contour has about 4 Steps.
To adjust the Number of Steps, move the White Slider.

Moving towards the Center creates more Steps for the Inside Contour.

Inside Contour
You can make further adjustments on the Property Toolbar.

Here's a Contour with decreased Offset.
Outside Contour

Adjust the Contour Color Progression by clicking its Icon on the Property Bar.


Clicking this Icon will open a drop down menu.

Contour Color Progression
Here's the same Shape with Clockwise Contour Colors applied.
Clockwise Contour Colors
 Here's the same Shape with Counterclockwise Contour Colors.
Counterclockwise Contour Colors
And finally have a look at some practical examples of Contours.
Contoured Star
Contoured Spirals


Wednesday, August 6, 2014

How To Create Blends in Corel Draw


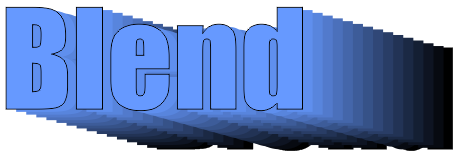
Blended Text

The Blend Tool is used to Blend 2 Objects together.

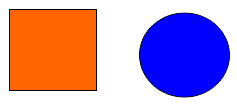
Start off by putting 2 Shapes on the page. Add a Rectangle and a Circle, using the Rectangle Tool and Ellipse Tool.
Add a different Fill Color to each Shape. First select the Rectangle and click a Color on the Color Palette located on the Left of the Screen.

Repeat for the Circle, choosing a different Color.

Move your cursor over the Drop Shadow Tool on the Toolbox.

Click the Black Arrow on the Right of this Icon to open a Flyout Menu.

Select Blend.

Move your cursor over any one of the Shapes, hold down your mouse button and drag to the next Shape.

You have a Blended Shape.

If you want to create your own Freehand Path for the Blend, hold down your Alt Key while making the Blend.

The Blend with follow the Path that you've drawn.

This is the Slider.


Move this Slider to the Left or Right to adjust the Color Progression from Start to End and also the Distance between Shapes in the Blend.

See the Progression of Color changes to be more Blue if the Slider is moved to the Left.

Here more Orange is seen as the Slider is moved to the Right.

If you want to change the Start Color of the Blend, select a Color from the Color Palette and drag to the White Square Handle located in the Middle of the Circle.

If you want to adjust an individual piece of the Blend, doulble click over that piece, and drag the Slider that appears.

You can clearly see 2 Sliders now, one is Green and the other is Red. Drag the new one Left or Right to make the adjustment.

You can now adjust the location of all 3 Handles of the Blend.

You can further manipulate the Blend by using the Blend Property Bar.

Check out the Presets.
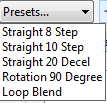
Blend Presets

Hit the Drop Down Arrow and choose an Option to see how it changes your Blend.
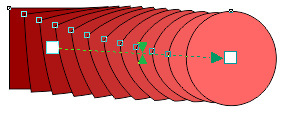
Direct Blend
All the Blends done so far, have been Direct Blends because there is a Direct Color Progression.

This is the Direct Blend Icon.

Selecting the Clockwise Blend Icon will create a Clockwise Progression through the Color Spectrum.
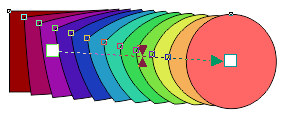
Clockwise Blend
Here's the effect on the Blend.

Whereas, selecting the Counterclockwise Blend Icon will create a Counterclockwise Progression through the Color Spectrum.
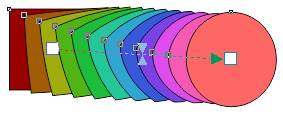
Counterclockwise Blend
Here's the effect on the Blend.

Play around with the Property Bar and discover all you can do with Blending.

Here are some practical examples of the Blend Tool.
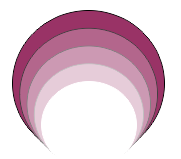
Blended Circles

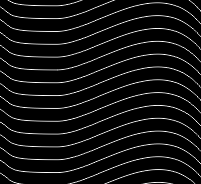
Blended Lines


Wednesday, June 18, 2014

Inkscape Video Tutorial: How to Make a Computer Classes Flyer Background


Here's a video tutorial on how to create the background for this Computer Classes Flyer using the Graphic Design Application - Inkscape.

Tuesday, May 27, 2014

Microsoft Word Video Tutorials - How To Create Beautiful Flyer Backgrounds with Microsoft Word

If you are a beginner to Microsoft Word, you will become more familiar with the Microsoft Word User Interface after viewing these Video Tutorials.

The 1st Video Tutorial shows you how to recreate the background for a Computer Classes Flyer using the Business Application - Microsoft Word 2013.

With this tutorial you can quickly learn how to do Document Setup, Create Rectangles, Edit Object Position & Size, Create Duplicates, Set Fill and Outline Color.


Microsoft Word 2013 Video Tutorial: Computer Classes Flyer

The 2nd Video Tutorial show you how to recreate the background for a Happy Father's Day Flyer using the Business Application - Microsoft Word 2013.

With this tutorial you can quickly learn how to do Document Setup, Create Rectangles, Set Shape Dimensions, Edit Fill & Outline Color, Edit Shape Points, Add Points, Arrange Order, Create a Duplicate, and Set Transparency.

Microsoft Word 2013 Video Tutorial: Happy Father's Day Flyer

Thanks so much for visiting and please share!!!

Saturday, June 29, 2013

Gradient Text in Microsoft Word 2010

A Gradient is a beautiful effect that combines 2 or more Colors together. This mini tutorial shows you how easy it is to apply a Gradient Fill to your Text in Microsoft Word 2010

Assuming you already have Text on your document, select it, then click on the Arrow on the Bottom Right side of the Font Group
This will open the Font Dialog Box. Select the Text Effects Button at the bottom of this window. 

This then opens the Format Text Effects Window.

In the Text Fill Tab select the Gradient Fill Button. You'll immediately notice a change to the options in this Tab. 

If you select the Preset Colors Icon, you can choose from 24 Preset Gradients.
Choosing any Gradient changes the Gradient Stop Colors. The Gradient represented here is Rainbow. I'll elaborate more on these Gradient Stops further down in this tutorial.
To apply this Gradient to the Text, click Close at the bottom of the Format Text Effects Window. Then click OK at the bottom of the Font Window.
Under the Preset Colors is an option for Gradient Type. The Gradient Type in the above example is Linear

The Type Box has options for Linear, Radial, Rectangular and Path
This is the Radial Type.
This is the Rectangular Type.
This is the Path Type.

There are many things that you can change to customize your Gradient. Let's change the Angle of the Rainbow Linear Gradient from 90 Degrees to 250 Degrees. Notice the difference.
It would be nice if there was a Preview of the Text as you made each change, but there isn't for this feature :( 

For 3 of the Gradient Types, there is also some Preset Directions below. So if you select a Linear Gradient Type, and then select Direction below, you will see 8 Linear Presets.
A Radial Gradient Type gives you 5 Radial Presets.

A Rectangular Gradient Type gives you 5 Rectangular Presets.
There is no Direction Presets for the Path Gradient Type.

Each Gradient Stop represents a Color on the Gradient. You can make changes to 1 Gradient Stop at a time. Adjustments can be made to each Stop's Color, Position, Brightness and Transparency
You'll know which Stop is selected since an Orange Border appears around it. Also the color of the Color Icon changes. 

Purple Gradient Stop selected.

Blue Gradient Stop selected.
You can also slide the Stops on to different positions on the Bar.
You may be wondering what happens if you have too many or too little Colors in your Gradient. If you want to Add a New Color to the Gradient, select the Add Gradient Stop Icon

If you wish to Remove a Color, select the Remove Gradient Stop Icon

With all of these options, you can make an endless array of Gradients

For a step by step illustrated Tutorial that demonstrates how to create a Flyer with a Gradient Filled Title and Object in Microsoft Word 2007 visit FlyerTutor.com

If you'd like to learn how to create other great Text Effects you can view the mini tutorial on Outline, Shadow, Reflection and Glow. As always, have fun exploring and creating new things and do feel free to leave a comment below. 

Disqus