 To Insert an Image go to the Menu Bar and select Insert > Picture > From File.


 The Resulting Image will be Flipped Upside Down compared to the Original Image.
  To Flip the Image Horizontally, select Modify > Flip > Horizontally.

 This will open up the Select File To Import Window.
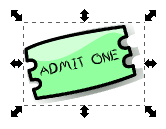


 This action opens a popup menu. Select the first Icon for Rotation.
 The 8 Green Squares Handles around the Image will change to 8 Red Circle Handles.

.png)


